Filezilla may be used to manage your WordPress site by uploading and downloading files and images. This article will guide you through the process of installing and using Filezilla to manage your WordPress powered blog hosted on the server.
For more information about FileZilla, view the list of features at the project site.
Why would I want to download FileZilla?
It's fast, stable, easy to use, and free. FTP is a standard way to upload or download files between your local system and your web server, and FileZilla is an solid client for everyday FTP needs.
Setting Up the Options
You will need the following details regarding the FTP account on your server:
1. Your website ftp address (usually ftp://example.com if your URL is http://example.com)
2. Your ftp username
3. Your ftp password
If you do not already have an FTP account on your server, use your cPanel or website administration tool to set one up -- it will have all the information needed. If in doubt, ask your host for directions or help regarding an FTP account for your use to access your webspace.
In the top left, click File then Site Manager

Figure 2: Site Manager screen
This next screen needs completing, and then we can get down to business.
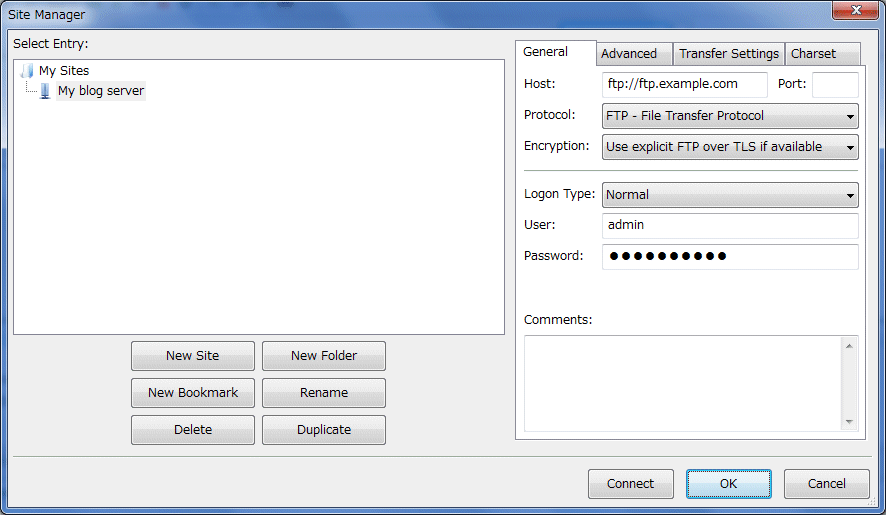
Figure 3: Ftp details
1. Click New Site then name the new connection to what you want (example: My blog server).
2. Enter the ftp address for your website. Usually, if your website is http://www.example.com, then the ftp address will be ftp://ftp.example.com or ftp://example.com. Do not put a / at the end unless specifically told to do so on your cpanel or by your host.
3. Leave this setting at FTP, and the Port number should also be left at 21. Only change these if your FTP account details explicitly indicate that you should.
4. Ensure that the Normal button is checked. (In later versions of the software the buttons are replaced by a pull-down list from which you can select Normal)
5. Put in the full username that you have been given. It may be just a username, or it may look like an email address (but it isn't one). For instance, it would look similar to user or user@example.com
6. Now enter your password. Remember that the password might be case sensitive.
Click Save and Exit. (Click OK in recent versions)
Connecting
In the top left of the Initial Screen (Figure 1), click Site Manager, and the screen you last saw (the FTP details screen, Figure 3) will pop into view. This time though, click the Connect button on the bottom.
If all is well, then in the top window of Figure 1, you will have seen a series of messages, and in the large window, you will see a listing of the files will appear.
Troubleshooting
If you had a problem, then it is time to go troubleshooting! Look at the top area (Figure 1) and check the messages.
1. If there was no attempt to connect, then the ftp address is wrong. All it needs is one character to be incorrect and it will fail. Click the red X, break the connection and click the Site Manager to check what you entered.
2. If it says that the user does not exist, check the Site Manager setting and ensure that it reflects what your FTP account details provided by your host says, or use the webserver administration interface provided to you by your host to re-check the existence of the FTP account. You may want to ask your web host for some assistance, too.
3. If it says Incorrect Login, your password could be wrong -- again, check it carefully, and watch your case (capitals and small letters).
4. If it says Could not retrieve directory listing you may need to change the Advanced setting for your connection in Site Manager, so that Passive transfer mode setting is set to Use passive mode.
Great post, thanks...always looking for quality host...Jameshttp://www.irockwebhosting.net
ReplyDelete